A sitemap is an XML file that provides information about all the important pages, files, images, or videos on your website. It provides search engines with an overview of all available content that should be discovered, crawled, and indexed.
It assists crawlers to understand what’s on your website. It also helps to find pages that are not linked internally on the site.
It’s good practice to add your sitemap location to the robots.txt file. Sitemap example:
Sitemap: https://www.marketingminer.com/sitemap.xmlHow does an XML sitemap look like?
Here’s what a typical XML sitemap looks like:
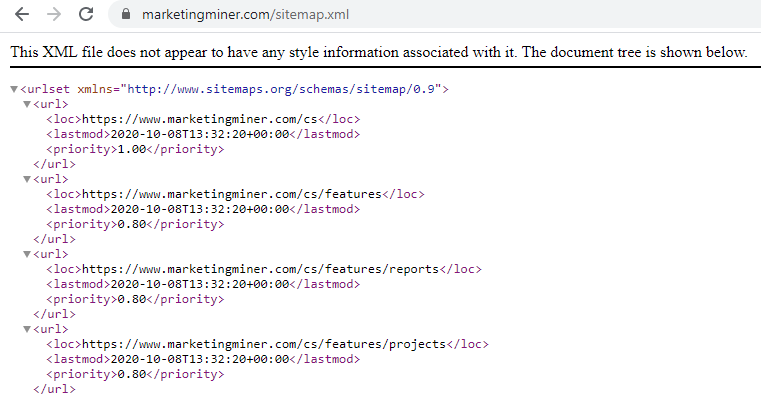
Many CMS create and manage sitemaps automatically and they can look a bit different. However, their purpose is always the same.
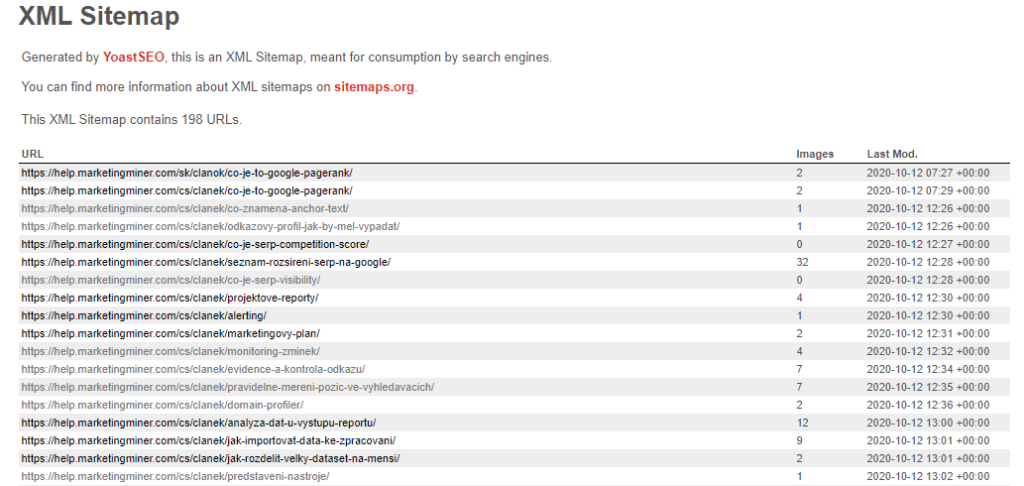
In the example above, you can see an automatically generated XML sitemap by YoastSEO, a WordPress plugin. Remember, it’s not important how the sitemap looks like, it’s all about the functionality.
Sitemap index
All sitemaps are limited to a maximum of 50,000 URLs. If you exceed the limit, you will have to create a new one. If you break your list into multiple sitemaps, you can optionally create a sitemap index. A sitemap index is an XML file (same as a sitemap) that contains links to a number of sitemaps files.
Let’s take a look at an XML sitemap example to analyze its parts in more detail:
<?xml version="1.0" encoding="UTF-8"?>
  <sitemapindex xmlns="http://www.sitemaps.org/schemas/sitemap/0.9">
    <sitemap>
      <loc>https://www.marketingminer.com/sitemap1.xml</loc>
    </sitemap>
    <sitemap>
      <loc>https://www.marketingminer.com/sitemap2.xml.gz</loc>
    </sitemap>
  </sitemapindex>
URL set
Every sitemap needs to have a <urlset> tag that describes which version of the XML sitemap protocol standard is used. You will often see version 0.9 which is supported by most search engines.
<urlset xmlns="http://www.sitemaps.org/schemas/sitemap/0.9">URL
Now we get to the most important part, the <url> tag. Every URL definition can contain the following tags:
- <loc> – contains an absolute URL. It should reference the canonical URL of the page you want to index. This is the required property for all <url> tags.
- <lastmod> – references the time at which the content on that URL was last updated. The date is in W3C date-time format (yyyy-mm-dd).
- <priority> – specifies the priority of the URL, relative to all other links from the sitemap on a scale between 0.0 to 1.0. A higher number is more important.
- <changefreq> – represents how frequently content on the page is likely to change. This tag tells crawlers how often they should recrawl the page. Valid values: always, hourly, daily, weekly, monthly, yearly, never.
Example:
<url>
     <loc>https://www.marketingminer.com/en</loc>
     <lastmod>2020-10-08T13:32:20+00:00</lastmod>
     <priority>1.00</priority>
     <changefreq>monthly</changefreq>
</url>
Other sitemaps
Sitemaps don’t only include website URLs, you can also create custom sitemaps for your media content as well as news sitemaps.
- Video sitemap – contains video information.
- Image sitemap – provides information about images on your website.
- Google News sitemap – this sitemap is useful especially for news sites when it’s important for Google to discover news articles as quickly as possible. To achieve this, your website needs to be accepted into Google News first.
Video sitemap
Video sitemap is a great way how to inform the crawler about your videos that are hosted on your own server to understand what the content is about. We recommend only adding new video content while it is still fresh.
Here’s what a video sitemap with all required parameters looks like:
<urlset xmlns="http://www.sitemaps.org/schemas/sitemap/0.9"
        xmlns:video="http://www.google.com/schemas/sitemap-video/1.1">
   <url>
     <loc>https://www.marketingminer.com/video/sitemap.html</loc>
     <video:video>                       <video:thumbnail_loc>https://www.marketingminer.com.com/thumbs/sitemap.jpg</video:thumbnail_loc>
       <video:title>XML sitemap file example</video:title>
       <video:description>What sitemap.xml is and how to create it step by step
         time</video:description>
       <video:content_loc>
          https://youtube.com/sitemap_video.mp4</video:content_loc>
       <video:player_loc>
         https://www.example.com/videoplayer.php?sitemap_video=123</video:player_loc>
      </video:video>
   </url>
</urlset>
Image sitemap
Image sitemaps are vital for being found by search engine crawlers. They help Google discover images that wouldn’t normally be found. For example, images that your site reaches with JavaScript code.
Here’s an example of image sitemap:
<?xml version="1.0" encoding="UTF-8"?>
<urlset xmlns="http://www.sitemaps.org/schemas/sitemap/0.9"
        xmlns:image="http://www.google.com/schemas/sitemap-image/1.1">
  <url>
    <loc>https://www.marketingminer.com.com/image_sitemap.html</loc>
    <image:image>
      <image:loc>https://www.marketingminer.com.com/sitemap.jpg</image:loc>
    </image:image>
   </url>
</urlset>
Together with an alt tag, image sitemaps provide crawlers with additional information about the images on the website.
Google News sitemap
If you want to increase the chances of your content showing in Google News, you should consider creating news sitemap that was created for this very reason.
Here’s the example of Google news sitemap:
<?xml version="1.0" encoding="UTF-8"?>
<urlset xmlns="http://www.sitemaps.org/schemas/sitemap/0.9"
        xmlns:news="http://www.google.com/schemas/sitemap-news/0.9">
  <url>
   <loc>https://www.marketingminer.com/en/blog/wordpress-plugin-v-1-0-launched.html</loc>
   <news:news>
   <news:publication>
     <news:name>Marketing Miner for WordPress has launched</news:name>
     <news:language>en</news:language>
   </news:publication>
   <news:publication_date>2021-04-20</news:publication_date>
     <news:title>Marketing Miner for WordPress has launched</news:title>
    </news:news>
  </url>
</urlset>
Google news sitemaps are a bit different as they can’t contain any articles that were published more than two days ago. The older URLs will be automatically removed from the news sitemap to only store the fresh content.
Do you need a sitemap.xml file?
Google finds new pages by crawling links it discovers on pages. But if your website is new without rich history, backlinks, and a great internal linking structure, it’s really hard for search engine crawlers to discover your content.
In this case, you need to implement a sitemap on your website to list all the important pages that you want search engine crawlers to find and index so users can see them in the search results.
Here’s when you should consider having a sitemap.xml file on your website:
- New websites – As we mentioned above, if you have a new website, make sure to create an XML sitemap and submit it to Google Search Console. Thanks to this action, Google will easily discover your content and index it.
- Large websites – If you have a website with lots of landing pages and poor internal linking structure, we recommend adding new landing pages to your sitemap dynamically to make sure the search engine crawler won’t miss them. This is mainly the case for large eCommerce sites.
- News websites – Websites that regularly produce lots of timely and topical articles (typically news sites) should have sitemaps too. They improve how quickly Google crawlers find your newsworthy content to index and show it in Google News. For news sites, we talk about Google News Sitemap that we already mentioned above.
- Rich media content – As we discussed before if your media content is difficult to access (for example, images that your site reaches with JavaScript code), we recommend using different types of sitemaps (video, image…).
Learn about sitemaps
- Submitting a sitemap doesn’t automatically guarantee the link referenced in it will be indexed and shown in the search results.
- Each sitemap can include a maximum of 50,000 URLs and it must be no larger than 50 Mb. For large websites, we recommend creating a sitemap index file that contains links to all your sitemaps (in the image below, you can see how it looks like for WordPress).
- You should only include indexable, canonical URLs to your sitemap. Make sure to use full absolute URLs, and not relative URLs.
- Google recommends putting a sitemap file in the root directory of your website and naming it sitemap.xml.
- Your sitemap index file must be UTF-8 encoded.
- It’s good practice to add your sitemap.xml to the robots.txt file.
How to create sitemaps
When creating a sitemap, it’s important to remember that you have to build it manually when not using a CMS that can create dynamically generated sitemaps. Let’s take a look at both ways in more detail below.
Manually creating a sitemap
If you don’t use a CMS with an automatically generated sitemap, you can create it manually (we recommend checking yourdomainname.com/sitemap.xml first to make sure your sitemap doesn’t already exist).
In this instance, Screaming Frog tool will be your best bet to generate a sitemap for free if your website doesn’t have more than 500 URLs. If your site is large, you will have to consider paid options.
We also recommend using the XML Sitemap Generator tool that crawls all your important web pages and automatically creates sitemaps: https://www.xml-sitemaps.com/.
When your sitemap.xml file is generated, make sure to download it and upload it to the root of the website.
WordPress
Most CMS such as WordPress, Prestashop, Joomla, Wix, or Shopify have plugins that generate dynamic sitemaps.xml files already.
In this guide, we look at the most widely used CMS platform, WordPress, and how you can create sitemap.xml files by using Yoast SEO plugin.
At first, you need to go to this page to download Yoast SEO plugin: https://wordpress.org/plugins/wordpress-seo/.
After you download and install the plugin, go back to WordPress and in the left menu navigate to SEO > General > Features and in XML sitemaps, select ON:

Now, the Yoast SEO plugin can automatically generate a sitemap.xml file that will be available at yourdomainname.com/sitemap.xml or yourdomainname.com/sitemap_index.xml for the sitemap index.
How to add a sitemap to Google Search Console
When your sitemap.xml file is ready and uploaded to your website, you can submit it to Google to crawl it as soon as possible. There are more ways how to let Google know about your sitemaps.
The quickest way to notify Google is to ping them specifically with the location of the sitemap: http://www.google.com/ping?sitemap=yourdomainname.com/sitemap.xml
After you submit your sitemap, you should see this message as confirmation that it has been received.

As you can see above, Google recommends adding your sitemap to Google Search Console to monitor its status of the submit or crawl and possibly other issues.
Sign in to your Google Search Console account and navigate to Sitemaps. In this section, you can add your sitemap’s URL (it’s mostly sitemap.xml or sitemap_index.xml).
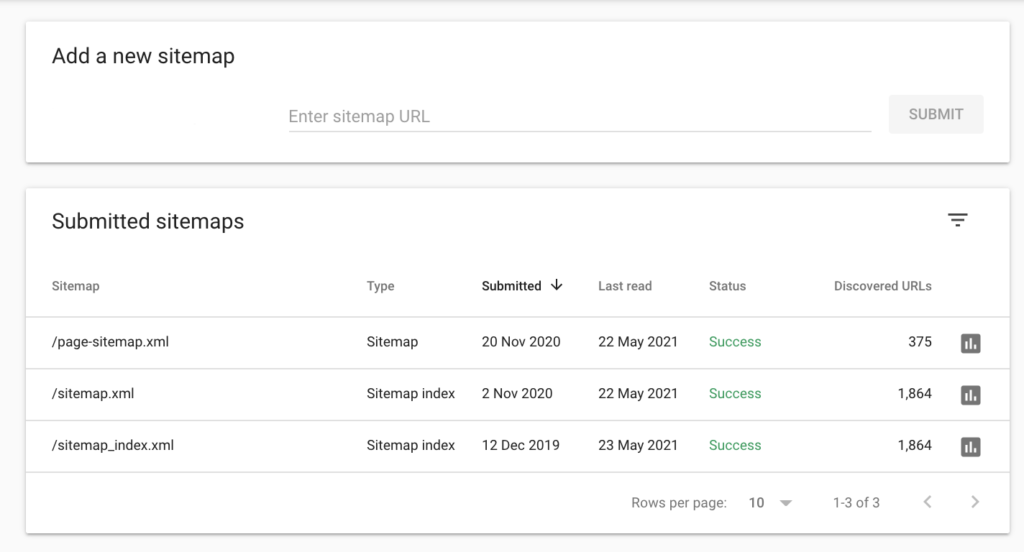
And that’s it! After you submit your sitemap files, you should see the Status column. This is where you can find out if the sitemap was loaded and processed successfully or with errors.
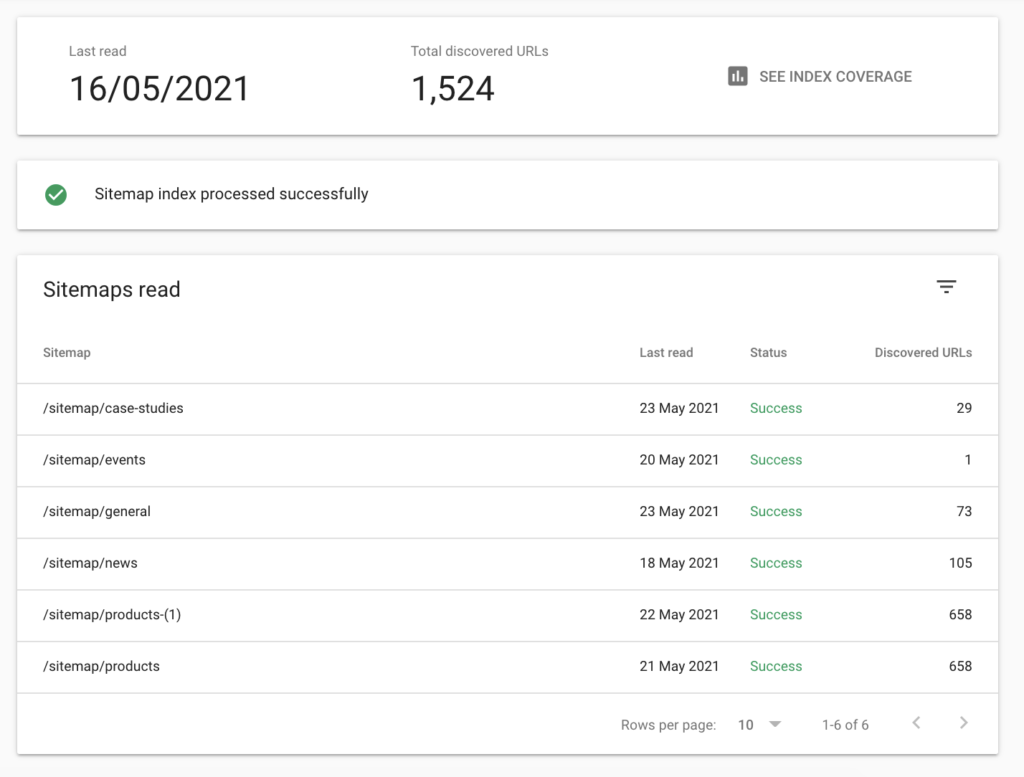
After clicking on the See Index Coverage button or navigating to the Coverage section in the left menu, you can view detailed information about specific URLs that were crawled.
It looks something like this:
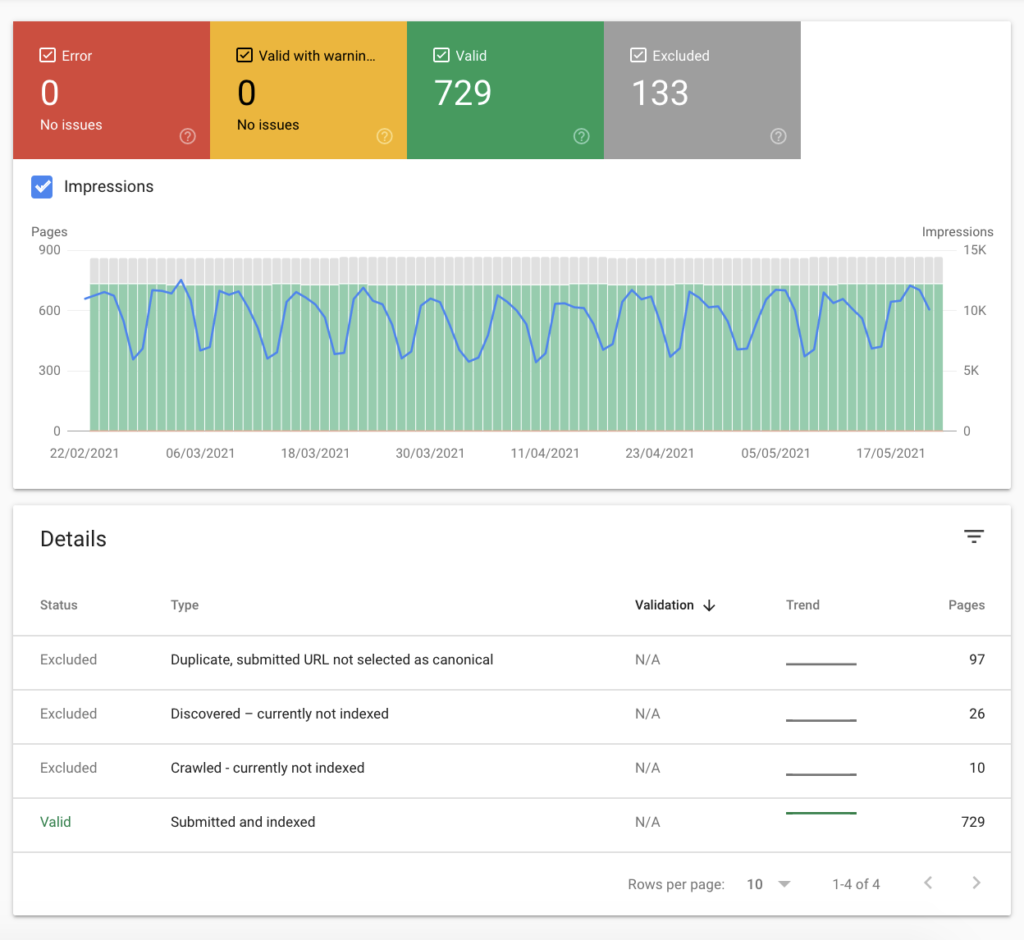
If you have any troubles with crawling and indexing your site, we recommend looking at the Sitemap errors section on this page to find out more details: https://support.google.com/webmasters/answer/7451001#errors&zippy=%2Ccomplete-error-list
Learn more about what sitemaps and Google Search Console here:
Conclusion
If you use a CMS, like WordPress, it is relatively quick and easy to generate your sitemap by using their plugins.
If not, you can create your sitemap manually or choose third-party tools to create it. These tools will crawl all your URLs and create a new sitemap that you will have to edit first to make sure it doesn’t include pages you don’t want to show up in the search results.
Don’t forget to submit your sitemap to Google to ensure that Googlebot will find and crawl it as soon as possible.
